Weekly Tech Tip: Trouble Shooting Realist in Internet Explorer - Compatibility View

You may find that you occasionally run into issues on Internet Explorer, especially after a Windows Update. This should be your first step in fixing this issue, and it’s quite easy!

Our example is based on using Realist Classic from Sandicor MLS, but can be applied any time you have an issue with Internet Explorer as a first step.

After a Windows Update, we see this error when attempting to access Realist Classic. The big hint is that it doesn’t say you are using IE, even though you are:

To fix, press your ALT key, which will bring up a menu:

Click on TOOLS and then select Compatibility View Settings:

Then click ADD and CLOSE:


The page should refresh and then it will work:

For a faster and safer internet experience, use Firefox and Google Chrome whenever possible.

Weekly Tech Tip: Lookout Mobile Security


Lookout is a mobile security app for your cell phone. It is a must have for any smartphone user as it provides security, backup, and location services. It is a FREE app that includes a Premium upgrade with more features that costs $3/month. It is available for both iPhone and Android devices.

There are 5 categories in Lookout: Security, Backup, Missing Device, which are free, and Safe Browsing and Privacy Advisor which come with the premium upgrade.

For Security, Lookout scans your device to provide advanced protection from threats. It scans every app in your device and updates its information on the latest digital threats.

Backup offers all your contacts in your phone to be saved to the cloud in case anything happens to your phone. Your photos and call history can also be saved to the cloud if you purchase the premium app.

Missing Device is perhaps the most advanced part of the app with several different features that help you find your lost phone. First is Scream that helps find your device by emitting a loud siren alarm and causes your screen to flash red and blue for 60 seconds. Second, there is Locate which speaks for itself. From Lookout.com you can locate your phone on a map using it’s GPS. When your phone is running low on battery, Signal Flare will automatically save your device’s location before it runs out of juice. Lock Cam is a feature that will take a picture of anyone who incorrectly enters your PIN, password, or pattern 3 times. Lookout will then email you the picture and your phone’s location.

With Premium you can also get Lock which keeps your personal info safe by locking your device remotely and allows you to create a lost message that will assist anyone who finds your phone in getting it back to you. And finally there is Wipe which will clear all texts, photos, contacts, logins, other data from your phone if it is feared to be truly lost.

Safe Browsing, which one of two categories available only for premium, scans all links you visit in real time to protect your device from phishing and other malicious sites and software.

The final category and other premium offer is Privacy Advisor, which scans all apps and gives you privacy alerts for anything that could make your private information at risk.

Learn More: https://www.lookout.com/

Download: 

Post your listings to Craigslist in seconds with Unique Property Sites

Did you know... besides providing easy and powerful individual property websites, the Unique Property Sites tool in 21Online will allow you to create Craigslist ads in SECONDS and for FREE!


How To:

1. Log Into 21Online.

Click on the Unique Property Sites (Edit) in the Tool Library Box.

2.  Click Edit Site for the property you would like to advertise (this will open PropertiesOnline in a new tab or window).


3. Click eFlyer (Craigslist) to access the HTML code for your Craigslist flyer.

You may also make any edit to your Unique Property Site by clicking on the Control Panel Options.

4. Click Select Snippet then press CTRL+C to copy the HTML code.

You may also click Preview to see what the ad looks like.

5. Go to Craigslist and log in, then select your posting city and click Go.

Logging in allows you to easily repost your ads once they expire. Follow the post category prompts until you get to the actual posting screen.

6. Place your cursor in the Posting Description box, then press CTRL+V to paste the HTML code.

Also fill in the posting title and any further information you wish to include according to the input boxes. Click Continue to proceed. You may optionally upload additional photos on the next page.

7. Preview your ad and click Publish.

If Craigslist requires any further action, follow the instructions provided. Otherwise, your post is now public!

Need more assistance?

Live training is available by clicking on Century 21 Learning System CLS in the Tool Library and searching for Unique Property Sites.
Click here for the full Post to Craigslist tutorial.
Click here for the Unique Property Sites FAQ.

Watch the Unique Property Sites video:


Create custom CENTURY 21 videos with Ad Maker

Did you know... The Ad Maker Tool in 21Online will allow you to customize popular CENTURY 21 advertisements, including videos, in SECONDS and for FREE!

Check out one of our agent's videos! It's the same video that was played during the 2013 Superbowl, but with the agent's contact information at the end!


How To:

1. Log in to 21Online.

Click on the Ad Maker System in the Tool Library Box (Ad Maker will open in a new tab or window).

2. Click on My Account and verify that your information is correct.

This is what will display at the end of the video. You can only edit the Personal Information. If there is an error or change needed in the Company Information, please email hr@century21award.com.


3. Click on Ad Library, then Videos.


Select the video of your choosing. 
  • Click the magnifying glass icon to preview (it will take several moments to render) and the shopping cart icon to order your custom video
  • You do not need to preview first if you would like to skip this step.


Select Send to Self in the Trafficking Options pop-up.


Click Continue Shopping to order more ads or Checkout to complete your order. Your custom video will be ready for download in a few minutes!


4. Download your video and Share!

Click on Finished Ads, then Order Number, followed by Click Here to View the Final Ad to start the download.

Once your .MP4 file has downloaded, upload it to YouTube, email it to your SOI, share on social networks, use it in your online marketing and display it on your website!

Need more assistance?

Full training is available in Ad Maker by clicking on Ad Maker Training:


Increase your online reach with your free MyC21 Site

Did You Know... 90% of people used the internet in their home search in 2012?


You probably already have your own website, but did you know that you also have a website through CENTURY 21?


Your FREE My C21 Site takes just moments to customize and generally ranks first page in Google Searches. To get started, just follow these directions:

1. Log into 21Online and click on My C21 Site next to your profile photo:

2. Double check your contact information. Need changes made to your CREST EDG Information? Contact Human Resources at hr@century21award.com.

3. Follow the prompts in the site wizard. Click the Save and Continue button to move on:


4. When you are finished, check out your final results!


Need more assistance? Get the full, self-paced tutorial in CLS!
  1. Log into 21Online and navigate to CLS in the Tool Library:
  2. Search for My C21, then click on the Self-Paced tutorial:

  3. Click Launch to begin the training:

You can also check out the Full User Guide or the FAQ.

Weekly Tech Tip: Use Facebook Lists

Facebook is an excellent way to stay connected with friends, family and clients, but as your Friend count grows, you may be facing a lot of information from a lot of different people. Drill down to what you need most by creating Facebook Lists.

Step 1: Create a new list.
After logging into Facebook, start by going to the profile page of someone you would like to add to a list. Click on the Friends button, then select "Add to list..."

Scroll down and select "+New List..."

Type the name of your list and press Enter to save.
*Note: According to Facebook, these lists are not public and notice will not be sent out that you added someone to a list. However, just in case this changes in the future, be mindful of what you're naming your lists!

Step 2: Mass edit your list.
You could go to each individual person and add them to your new list following the steps above (selecting the list name instead of creating a new list), however the easiest way to add additional people to your new list is by going to your Lists Homepage (https://www.facebook.com/bookmarks/lists)

Click on the name of the list you just created:
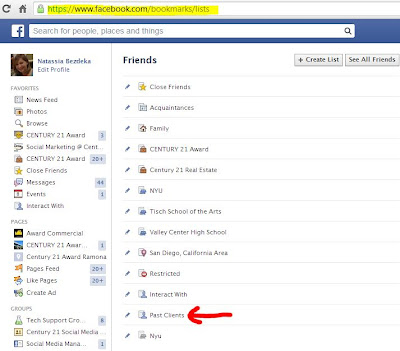
You can also create lists from this page.


Then click Manage List > Edit List in the upper right hand corner:


Then click On List List > Friends to see your whole friends list:


Simply click on the friends you would like to add to this particular list. A check (like Albert Bui) means they're on the list; no check (like Allison Brekke) means they are not on the list. Click finish when you are done.


You can edit your list as often as you like.

Step 3: View your list in the Newsfeed.
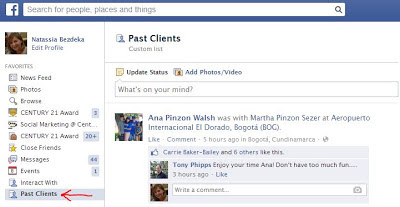
To make your list easily accessible, locate it in the left sidebar under Friends - you may have to scroll down a bit. Click on the Edit Pencil and select "Add to Favorites":


You will now see the list under Favorites in the left sidebar. Simply click on it to see updates only from the people you've added to your list:


Weekly Tech Tip: Daily Agenda Delivery


If you're the type of person who likes to know what the day has in store for them, and you're also the type of person who checks their email first thing in the morning, this week's tip will be a real treat. Set up Agenda Delivery in your Google Calendar and receive a daily email around 5AM with the contents of your calendar.

Step 1: Click the drop-down arrow next to My Calendars and select Settings.

Step 2: Click on Notifications for the calendars that you would like to receive daily emails for. In my case, I keep separate calendars based on the activity type.

Step 3: Check the box for Daily Agenda and click Save. Repeat for as many calendars as you want in your agenda.

That's all there is to it! From now on, your agenda will be delivered to your inbox first thing in the morning to inform you about your day:


Related Posts Plugin for WordPress, Blogger...